Introduction
With my Windows program MakeMap, you can make a map of all photo locations in an album made with most current jAlbum skins.
First you should download and install this program from my website.
I did not buy a Microsoft security certification, so during the installation you will see messages like 'Setup.exe is not downloaded frequently and can be dangerous' and 'Your PC is protected'. Ignore these messages and choose actions like 'More information' and/or 'Nevertheless, do the installation'.
You can make two types of maps: a Google Earth Map and an OpenStreeMap as has been described in the help-file.
The most simple way is to use an OpenStreetMap, because this does not require an API-key.
If the album shows pictures of a walking or cycle tour and you made a gpx-track of the tour with a GPS-device or a navigation app like Wikiloc, you can also add this track to the map. The easiest way to do that is to use my Windows program ConvertTrack, You can download and install this program from my website.
This note describes how you can make such a map for an album made with the skins made by Laza.
A simple OpenStreet Map
You can only make a map if your images contain a GPS location.
First make and upload the album and don't forget to select the settings to show a location button in the in the Lightbox.
Next open program MakeMap and select the following settings:
Use the button 'Select Root directory' to select the root directory of your websile and enter the corresponding URL of your web-site in the text-box after 'External URL:'. The structure of the output folders on the PC must match the folder structure on the server.
If you follow the Album recommendation to use as output folder a sub-folder 'album' of the project folder (which I never do), you have to fill in these fields for each album you make: Put the absolute address of the album folder in field 'Local root folder' and the corresponding URL of that album in the 'External URL' field.
Note: You should not use ' or " characters in folder names or in URLs.
If you open the first combo-box in the MakeMap program you see the skins which are supported by program MakeMap. Select here 'Plain' for the Plain skin and 'Tiger' for the Tiger and Lizard skin.
Next browse with the 'Select a slide image' button to the slides output folder and select an image in that folder.
Next click on the button 'Make Map'. This will create two files in the output folder: a web-page OSM_Map.html and a file waypoints.js which contains the photo locations.
To see the result, click on the 'Show Waypoints in Map web-page'.
If you do not see all locations on the map, lower the 'Zoom level' and click again on the 'Make Map' button. If you like to see more details, raise the zoom level.
Next you should make a link to the generated map. The simplest way is to do that with a link in the album description via the HTML editor:
See here an example of such a link.
Another way is to make a weblocation of the map. To do that open the uploaded album and replace the text 'index .html' in the browser address field by 'OSM_Map.html' and click on the return button. The map page opens and you see now the URL of the map page. Drag and drop that URL to your album or make a weblocation by clicking with the right mouse button in the explorer window and select weblocation, where you can also enter that URL.
Finally make and upload the album again. You will see an album like this example album.
In version 3 of program MakeMap it is possible to show your current position, this has been described in this blogpost.
Add a track to the OpenStreetMap
Open my program ConvertTrack and browse to the gpx-file via the 'Open' button:
Next click on the 'Save as...' (on the Dutch screen shot above showed as 'Sla op als...') button and save the file as trackl.js in the output folder of the album. Other names (like 'track-2.js') are also allowed as long it starts with the text 'track'.
Finally upload the album again.
A simple Google Map
Follow the same procedure as has been described above for the OpenStreetMap, but select next settings after you opened Program MakeMap:
After you selected an image in the slides folder and next clicked the 'Make Map' button, two files are created in the output folder: the web-page 'GoogleMap.html' and the file 'map.kml' which contains the photo locations.
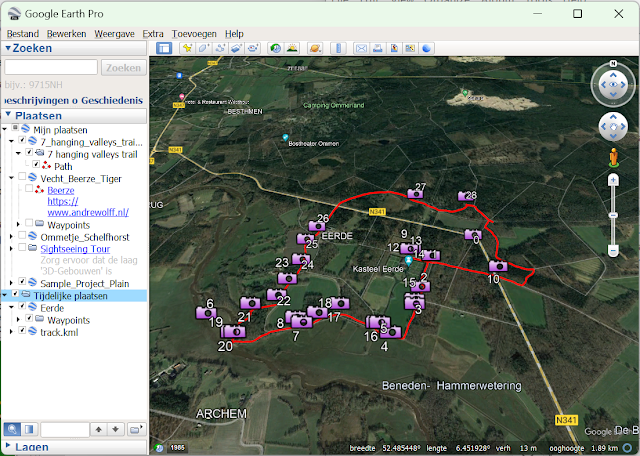
After you made the map you can see the result by clicking on the button 'Show Waypoints in Google-Earth' if you installed the Google Earth program on your PC.
To use the other button 'Show waypoints in a web-page', you have first to upload the album with the new files.
Finally make the link to the GoogleMap.html' web-page and make and upload the album.
Add a track to the Google Map
You can do this only if you installed the Google Earth program on your PC.
Open my program ConvertTrack and browse to the gpx-file via the 'Open' button.
Next click on the 'Save as...' (on the Dutch screen shot above showed as 'Sla op als...') button and save the file as track.kml on your PC, for example in the output folder of the album. Open first your file map.kml and next file track.kml with program Google Earth:
'Save location as...' and select file map.kml in the output directory. Overwrite file 'map.kml'.
Next upload the album again.
Open the Lightbox via the thumbnail in the Map
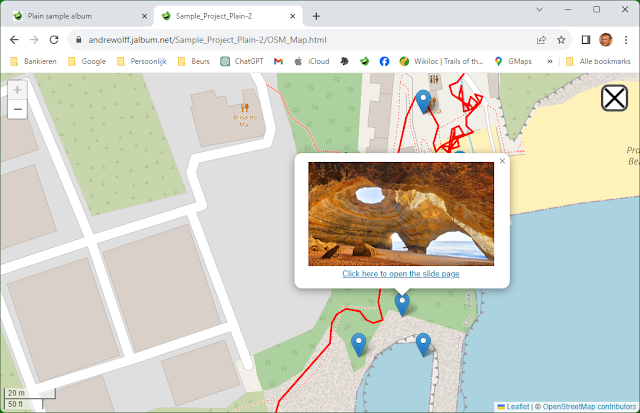
If you click on a waypoint in a generated map, a thumbnail will be showed like this:


