Posts tonen met het label 'Plain. Alle posts tonen

17 juni 2025

Comparing jAlbum Skins


Comparing jAlbum Skins

Introduction

To evaluate and compare various jAlbum skins, I created several albums using identical image content. To highlight the differences between skins, I also included a web location pointing to a Wikipedia page, an MP4 video, a YouTube video, a 360° cylindrical panorama photo, and a 360° spherical panorama photo.

This review includes the skins bundled with jAlbum as well as four custom skins I developed. All of these skins can generate single-page web albums, featuring enlarged images displayed in lightboxes with optional full-screen and slideshow functionality.

You can view the comparison via this album of albums web page:


You see there the next jAlbum bundled skins:

Animatics

A full-window, responsive skin from the Tiger/Projector/Photoblogger/Lucid family. Unlike most skins, it begins with the first image in a lightbox rather than a thumbnail overview.

Lizard

A continuation of the Chameleon tradition, starting with a thumbnail view and a feature-rich top bar for navigation.

Lucid

Behaves like Animatics: if there are no folders, the album opens directly in a lightbox.

Photoblogger

A responsive, feature-rich skin offering social media integration, image sliders, a shopping cart, tag cloud, feedback, and maps. It starts with thumbnail view when folders are absent.

Projector

Also full-window and responsive, this skin emphasizes slideshow presentation. It starts with a theme image and a button to launch the slideshow.

Story

A single-page skin designed for a mix of images, videos, and text. You can add custom (HTML) content or dedicated text blocks.

Tiger

jAlbum’s most widely used skin. It inherits many Photoblogger features and presents a responsive layout, starting with a thumbnail overview when no folders exist.

Plain

A minimalistic skin utilizing the PhotoSwipe lightbox (also used by my PhotoSwipe skin). The demo album leverages `.inc` files for custom code insertion, as described in my blogger note,

Next to these bundled skins, I show these images in my 4 skins:

PhotoSwipe

Uses PhotoSwipe 5 lightbox, similar to Plain.

FancyBox

Employs fancybox-3 for sleek image display.

LightGallery

Built around the LightGallery library, supporting over 20 CSS3 slideshow transitions. It includes animated zoom effects on opening/closing the lightbox.

Slide Show 4

A successor to Improved Slide Show 3. All slide content is embedded in the index HTML file—there are no separate slide pages.

The last 4 skins are ideal for showcasing travel and walking tours, offering responsive thumbnail layouts and extra features like the display of Google Maps or OpenStreetMap maps, download GPS tracks, open other albums etc, which are implemented via buttons on the index page.

Feature Comparisons

Full-Screen Support

All skins support full-screen image viewing, but how it's implemented varies. For example:

  • Tiger, Photoblogger, Projector: full-screen must be pre-configured; it can’t be toggled by viewers, although Photoblogger and Tiger allow adding a button for this.
  • Animatics, Lizard, Lucid, Story: include a full-screen toggle button in the lightbox's top-right corner.
  • Slide Show 4, PhotoSwipe, LightGallery, FancyBox: a full-screen toggle button can be be enabled from the lightbox settings window or the viewer may select it in the viewer settings window.

Slideshow Transitions

  • Photoblogger, Story, Plain, Lucid: offer just one transition type.  The Story and Photoblogger skins allow the viewer to change the view time.
  • Tiger, Lizard: support three types, but no viewer control.
  • Animatics: supports four transitions, but the viewer can't change the type of transition or the view and transition time.
  • Projector: supports eight transitions, but the viewer can't change the type of transition or the view and transition time.
  • PhotoSwipe: doesn’t support transitions, but lets the viewer control viewing time.
  • Slide Show 4, FancyBox: six transition types, all viewer-selectable.
  • LightGallery: leads with a whopping >20 user-selectable transitions.

Background Music

All skins support background music. The Slide Show 4, PhotoSwipe, LightGallery and FancyBox skins are limited to a single MP3 file.

Web Locations & Videos

  • Tiger, Photoblogger, Projector, Lucid, Animatics: web locations appear in separate sections of the index page.
  • Lizard, Story, Plain: show them in-line with image thumbnails.
  • Slide Show 4, PhotoSwipe, LightGallery, FancyBox: support inline web locations with an integrated “Back” button.

YouTube videos behave like web locations and share their display limitations.

360° Panoramas

  • Spherical panorama images are supported in Photoblogger, Story, Tiger, PhotoSwipe, FancyBox, and Slide Show 4.
  • Cylindrical panoramas auto-pan in Lizard, Story, Tiger—but not infinitely. The Slide Show 4, PhotoSwipe and FancyBox skins feature smooth, continuous panning both on desktop and mobile.

Maps

  • Photoblogger, Story, Tiger: generate maps with all photo locations via built-in skin code.
  •  PhotoSwipeFancyBox, LightGallery and Slide Show 4.: support advanced interactive maps (via my Windows program MakeMap), which include GPS tracks, photo markers, viewer’s location, and Google Earth or OpenStreetMap support.
  • These maps can also be made by MakeMap and  added to other skins (e.g., Tiger, Projector, Plain) using custom code as shown in the discussed albums.

Other Unique Features

  • Shopping cart: Available in Tiger, Story and Photoblogger.
  • Search feature: Found only in TigerLizard, StoryProjector, and Photoblogger.

Smartphone Testing

I tested all skins on an iPhone 13 Pro (in portrait mode: 320×509 logical px). Here’s how they fared:

  • Animatics: Issue when tapping the title bar.
  • Lizard: Caption size is problematic, and the top bar could be more compact on small screens.
  • Lucid: Similar caption issues.
  • All other skins: Displayed well on the small screen.


19 maart 2024

How to show Route Maps in Albums made with the Plain, Lizard or Tiger skin


Introduction

With my Windows program MakeMap, you can make a map of all photo locations in an album made with most current jAlbum skins.

First you should download and install this program from my website.

I did not buy a Microsoft security certification, so during the installation you will see messages like 'Setup.exe is not downloaded frequently and can be dangerous' and 'Your PC is protected'. Ignore these messages and choose actions like 'More information' and/or 'Nevertheless, do the installation'.

You can make two types of maps: a Google Earth Map and an OpenStreeMap as has been described in the help-file.

The most simple way is to use an OpenStreetMap, because this does not require an API-key.

If the album shows pictures of a walking or cycle tour and you made a gpx-track of the tour with a GPS-device or a navigation app like Wikiloc, you can also add this track to the map. The easiest way to do that is to use my Windows program ConvertTrack, You can download and install this program from my website.

This note describes how you can make such a map for an album made with the skins made by Laza.

A simple OpenStreet Map

You can only make a map if your images contain a GPS location.

First make and upload the album and don't forget to select the settings to show a location button in the in the Lightbox.

Next open program MakeMap  and select the following settings:


The setting of 'Back button closes window' determines what happens if you click the close button in the upper right corner of a map. If you open the map in a new tab, you should check this check-mark. In most cases I open a map in a new tab, in which case  I check that checkmark.

Use the button 'Select Root directory' to select the root directory of your websile and enter the corresponding URL of your web-site in the text-box after 'External URL:'. The structure of the output folders on the PC must match the folder structure on the server.

If you follow the Album recommendation to use as output folder a sub-folder 'album' of the project folder (which I never do), you have to fill in these fields for each album you make: Put the absolute address of the album folder in field 'Local root folder' and the corresponding URL of that album in the 'External URL' field.

Note: You should not use ' or " characters in folder names or in URLs.

If you open the first combo-box in the MakeMap program you see the skins which are supported by program MakeMap. Select here 'Plain' for the Plain skin and 'Tiger' for the Tiger and Lizard skin.

Next browse with the 'Select a slide image' button to the slides output folder and select an image in that folder.

Next click on the button 'Make Map'. This will create two files in the output folder: a web-page OSM_Map.html and a file waypoints.js which contains the photo locations.

To see the result, click on the 'Show Waypoints in Map web-page'.

If you do not see all locations on the map, lower the 'Zoom level' and click again on the 'Make Map' button. If you like to see more details, raise the zoom level.

Next you should make a link to the generated map. The simplest way is to do that with a link in the album description via the HTML editor:


See here an example of such a link.

Another way is to make a weblocation of the map. To do that open the uploaded album and replace the text 'index .html' in the browser address field by 'OSM_Map.html' and click on the return button. The map page opens and you see now the URL of the map page. Drag and drop that URL to your album or make a weblocation by clicking with the right mouse button in the explorer window and select weblocation, where you can also enter that URL.

Finally make and upload the album again. You will see an album like this example album.

In version 3 of program MakeMap it is possible to show your current position, this has been described in this blogpost.

Add a track to the OpenStreetMap

Open my program ConvertTrack and browse to the gpx-file via the 'Open' button:


Next click on the 'Save as...' (on the Dutch screen shot above showed as 'Sla op als...') button and save the file as trackl.js in the output folder of the album. Other names  (like 'track-2.js') are also allowed as long it starts with the text 'track'.
If you click the Make Map button in program MakeMap, all js-files starting with the text ‘track’ will be added to the map.

Finally upload the album again.

A simple Google Map

Follow the same procedure as has been described above for the OpenStreetMap, but select next settings after you opened Program MakeMap:


Notice that you have to enter your Google maps API key in the 'Google API key' field, this is the same key as you use in the skin Ligthbox 'API key' text-box.

After you selected an image in the slides folder and next clicked the 'Make Map' button, two files are created in the output folder: the web-page 'GoogleMap.html' and the file 'map.kml' which contains the photo locations.

After you made the map you can see the result by clicking on the button 'Show Waypoints in Google-Earth' if you installed the Google Earth program on your PC.

To use the other button 'Show waypoints in a web-page', you have first to upload the album with the new files.

Finally make the link to the GoogleMap.html' web-page and make and upload the album.

Add a track to the Google Map

You can do this only if you installed the Google Earth program on your PC.

Open my program ConvertTrack and browse to the gpx-file via the 'Open' button.

Next click on the 'Save as...' (on the Dutch screen shot above showed as 'Sla op als...') button and save the file as track.kml on your PC, for example in the output folder of the album. Open first your file map.kml and next file track.kml with program Google Earth:


Click with the right mouse button on 'Temporarily places' and next on

'Save location as...' and select file map.kml in the output directory. Overwrite file 'map.kml'.

Next upload the album again.

Open the Lightbox via the thumbnail in the Map

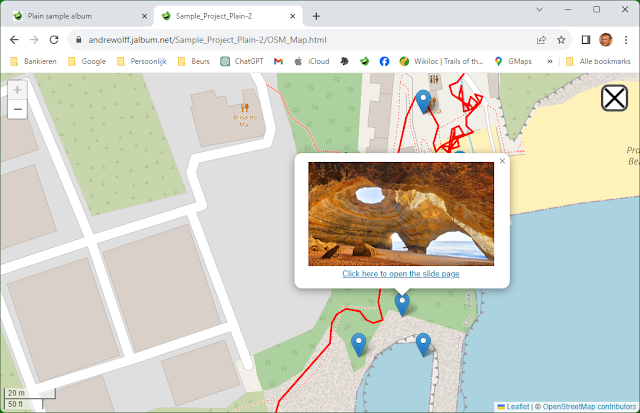
If you click on a waypoint in a generated map, a thumbnail will be showed like this:


If you click on the thumbnail, the lightbox with the correponding slide will be opened in most supported skins, see for example this PhotoSwipe skin album, this Tiger sample album and this Lizard sample album.

With the Plain skin version 3 and MakeMap version 2.8 you can set check-box 'Enable links' without the use of include files.

If you set check-mark 'Use image as waypoint ...' you will see thumbnails as markers, see this Plain sample album or my Plain Schotland album..