27 september 2014

The responsive thumbnail gallery for the PhotoSwipe and Slide Show 4 skin.


Up to version 2.3 of the Slide Show 4 skin for the jAlbum program, the thumbnails were displayed in an elastic table, were the thumbnails were reduced in size if the window size was reduced and enlarged if the window was enlarged.

As an example look at the next two screen-shots:

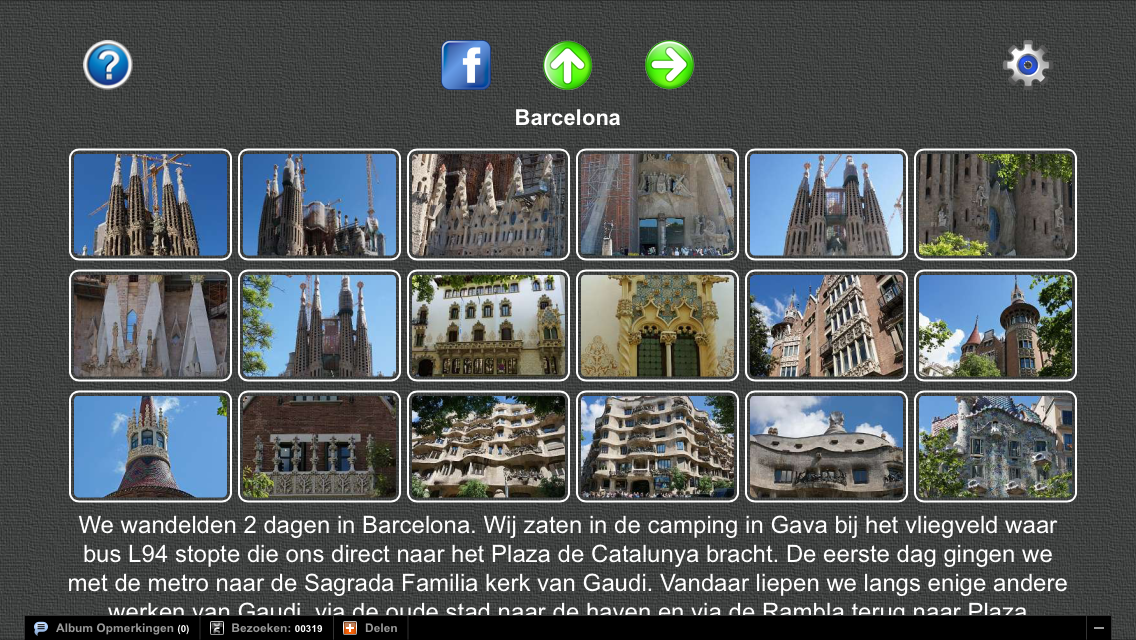
This shows the thumbnails of my Barcelona album on a monitor with a resolution of 1920x1080.

In the album settings we selected here a fixed-sape thumbnail layout of 9 columns and 10 rows, so that all 70 pictures were visible on the screen. The image bounds of the thumbnails was set at 240x160.

If we reduce the window width, the thumbnails will shrink:


This elastic design used in the PhotoSwipe and Slide Show 4 skin is based on the good old html table structure and is works fine on Android tablets, on the iPad and iPhone and on a PC with the Chrome and Safari Browsers. It is not supported by Firefox and by the Internet Explorer.

Try it yourself by opening my Barcelona album with the fixed number of thumbnails per row.

If we display this album on the small screen of an iPhone, the  thumbnail gallery shows as follows:


In the responsive design you can hide the theme image on small devices, what has been done here. You see here all thumbnails on the screen, but in rather small shape. 
You can enlarge the thumbnails somewhat by rotating the iPhone to landscape mode:

It looks better on an iPad:

Up to version 2.3 of the Slide Show  skin you could improve this only by defining in jAlbum a limited number of thumbnails per index page. For instance if we set the number of rows to 3 and the number of columns to 6, we get larger thumbnails on the iPhone:


To see the other thumbnails you have to swipe to the left or click the green right arrow.

In version 2.3.1 of the Slide Show 4 skin and in the newer PhotoSwipe skin, we introduced a second display mode, where the number of  thumbnails per rows is reduced if the area for the thumbnails is reduced.

We selected again a thumbnail layout of 9 columns and 10 rows, and  image bounds of the fixed-shape thumbnails of  120x80.

If we now reduce again the window width, we see first that the number of thumbnails per row is reduced and finally you get the next display of 4 thumbnails per row:


On an iPhone this album looks as follows:


Use the area on the sides of the thumbnails to shift the thumbnails up or down with your finger.

On an iPad it looks as follows:

Try it yourself by opening my Barcelona album with variable number of fixed-shape thumbnails per row. The selected thumbnail image size is in this example 1000x100.

This way of presentation is in particular very useful if you have an album with a very large number of pictures which you like to present in one galery. A good example of such an album is my Nepal album, where also filters are used to create nice borders.

If an album contains also folder albums, the thumbnail folder icons are now displayed in a second table of  thumbnail folder icons after the slide picture thumbnails of the top album. However it is the responsibility of the album creator that the folders are located after all normal images in the jAlbum Explore. 

As you can see in the screen-dump of the Index page settings above, you can select the border color of these  thumbnail folder icons.

Click here  for an example of an album with folders with a variable number of thumbnails per row and thumbnails of different sizes and click here for the same album with a gallery of variable thumbnails per row but now with fixed-shape thumbnails.

The new implementation did not use html table tags, only div tags combined with CSS3 media queries. It was based on the article of  Joshua Johnson How to build a Responsive Thumbnail , but in version 2.3.2 it is replaced by a design based on a table, as is also used in the Mirage skin of Chris Twist. This gives a nicer symmetrical thumbnail gallery which works fine on Android tablets, on the iPad and iPhone and on a PC with all browsers including Firefox and  Internet Explorer. 


The table design is in version 2.4.2 of the Slide Show 4 skin  replaced by a <div> structure which gives equal spaces between the thumbnails and the number of thumbnails per row depends on the available screenspace on a row.

In version 2.6 of the Slide Show 4 skin and in the PhotoSwipe skin is a new thumbnails design implemented. This design is implemented without <table> tags. The table is constructed of floating <div>s.

So we have now 3 types of thumbnails presentations:
  1. An elastic thumbnails table which uses <table> tags. Supported by all mobile devices but on a PC Firefox and Internet Explorer do not support the resizing of the thumbnails. For an example click here
  2. An elastic thumbnails table which does not use <table> tags. Supported in all browsers both on mobile devices and PCs. To see the same album in that design click here. To see an example with folders, see my Texel album
  3. A responsive design where the size of the thumbnails does not change, but the number of thumbnails per row may change if the window/screen size is different. Supported in all browsers both on mobile devices and PCs. To see the same album in this design click here
For method 1 and 2 fixed-shaped thumbnails are mostly used, but in method 3 I use most times thumbnails size 1000x100 wit check-box 'Fixed-shape thumbnails' cleared.

You can choose the type of thumbnails gallery on the Slide Show 4 Index page settings:


Choose type 3 gallery by setting the 'Variable number of thumbnails per row' check-box. If that check-box is cleared an elastic table is used for the gallery. If check-box 'Don't use <table> tags is cleared, the classical html table structure is used in gallery type 1
.

Click here  to download and install newest version of the Slide Show 4 skin and click here to open the Slide Show 4 skin manual.

19 september 2014

How to show panoramic pictures with the Slide Show 4 skin, the FancyBox skin or the PhotoSwipe skin?


Both the Slide Show 4 skin, the FancyBox skin and the PhotoSwipe skin makes it possible to expand slides of panoramic pictures:


If you click the gray expand button above this picture, the image is enlarged, so that the whole window height is filled by the picture:


You can scroll horizontally through the picture with the mouse on a PC or with your fingers on a tablet or mobile phone.

To try it yourself, open  my Terschelling album and click next the folder West-Terschelling and click there on the 25th thumbnail to open the panoramic picture shown above.
See also this album with only panoramic pictures.

Normally I use as image bounds for the slides HD quality 1920x1080. But this gives for panoramic pictures which are expanded to the screen height sometimes a bad quality image. So before I create the final version of an album, I open each panoramic image in jAlbum's Explorer next I click in the right panel on the triangle before Panoramic image select depending on the type of panorama the 'Spherical panoramic image' check-box or the 'Cylindrical panoramic image' check-box. In case you made a 360° cylindrical panorama, you should also select the '360° panorama'.

You should see a window like this:


Next clear check-box 'Progressive mode' on Album Setting / Images /Advanced:


If you don't do this, the panoramic pictures can't be displayed on an iPhone or iPad.

Next (re-) create the album by selecting 'Make All' (Shift+F9), all slides will be made in the defined default size (1920x1080 in my case), except the panoramic picture which has been edited. The height of the panoramic picture  is set to 1080 pixels; the width depends on the aspect ratio of the panoramic picture, but  if the width exceeds 30000 pixels, it is limited to 30000 and the height is made smaller as 1080 pixels. In the example above, the width is 6791 pixels.

I stitch my panorama photo's with program autopano pro or with Lightroom 6, which makes it also possible to generate 360° panoramas. As an example go to my West-Terschelling folder as indicated above and click on the 3th thumbnail. Next you see the whole compressed panoramic picture:


To expand it, click the 360Cities button and next the expand button in the right corner. The whole screen will be filled with your panorama and you can scroll through the panorama with the mouse or with your fingers.

If you stitch this with program autopano pro  it is imprtant that you see that the range in the detected panorama is 360°:


In the rigth panel you should see behind “FOV” 360.00

After you created the panorama you can upload it to the 360Cities site. Before you can do that you should create an account on 360Cities.

Once the panorama is uploaded and published, click on the View button in your profile of published images and copy the URL of the panorama to the clipboard.

Next open edit image window in jAlbum for the corresponding picture and click the Link arrow in the right panel:


Next past the URL of the panorama into the URL field of the link panel and check check-mark "Link to an external panorama picture page, ...".

Finally create the album.


09 juli 2014

Borders and frames with the FancyBox, the Slide Show 4 and the PhotoSwipe skin

I present the pictures of our trips with the jAlbum program and the Slide Show 4 skin, the FancyBox skin or the PhotoSwipe skin which I designed for that program. How I do this has been described here (in Dutch). This note describes how you can present the photos with borders and frames.

With the eXtended Border filter available in the jAlbum program. It is possible to make borders and frames around pictures in all skins, so also in my Slide Show 4 skin, in my FancyBox skin and in my PhotoSwipe skin. With the PhotoSwipe skin this is the only way to get borders around the slide image.

Unfortunately a graphical interface to the eXternal Border filter is missing in the jAlbum program. For each filter you like to use, you have to add a user variable via Settings / Advanced / User variables:


The filters should get the names filter1, filter2 etc. No spaces are allowed.
The text in the values section has been described in the jAlbum filters manualFor the describtion of the colors you can use the HTML Color names.

If you like to apply borders and / or filters both for a Slide Show 4 index page (parameter thumbnails) and for the slide pages (parameter closeups), it is advised to use 2 filters as showed above.

After you filled the User Variables, press the "Rebuild all" to have the album generated and filters applied If the building is ready, the index page with the above settings look as follows:


and a slide looks as follows:


Another example:

filter1 class=XBorderFilter bgCol=#8fa1b9  boWidth=8 boCol=ivory  frWidth=5 frCol=Khaki shWidth=8 clip=15  shCol=Black thumbnails

filter2 class=XBorderFilter bgCol=#8fa1b9  boWidth=20 boCol=ivory  frWidth=10 frCol=Khaki shWidth=15 clip=25 shCol=Black closeups

Click here to see the result on my jAlbum website

In the Slide Show 4 and PhotooSwipe skin settings for the index page you should set all border widths to 0:


You should do that also for the Slide Show 4 skin slide page:


But this is not required for the PhotoSwipe slkide page settings, because the PhotoSwipe skin shows the slide images always without borders.

If you like to select a real shadow, use the following user variables:


filter1 class=XBorderFilter bgCol=White frWidth=6 frCol=ivory frTrans=0 clip=80 shWidth=50 shDrop=norm shCol=Black closeups
filter2 class=XBorderFilter bgCol=White frWidth=3 frCol=ivory frTrans=0 clip=20 shWidth=15 shDrop=norm shCol=Black thumbnails

This gives the following index page:


and as slide page:


The parameter Clip=80 defines here the rounded corners. To see this album on the web, click here.

You can use this too in embedded albums, see my homepage.

Click here to see an example of a small frame around the slides and thumbnailswith a shadow. It has been made with the following User Variable:


filter1 class=XBorderFilter bgCol=#3d3f3e frWidth=3 frCol=White shWidth=15 shDrop = hard shCol=silver clip = 80 closeups
filter2 class=XBorderFilter bgCol=#3d3f3e frWidth=2 frCol=White shWidth=8 shDrop = hard shCol=silver clip =14 thumbnails

The background color bgCol is selected with the color picker in PhotoShop Elements, to match the color of the Gray-Textile background used in the Slide Show 4 skin.

My last example, see here, shows an album with borders and frames made with the following user variables:


filter1 class=XBorderFilter bgCol=#8fa1b9 boWidth=8 boCol=ivory frWidth=5 frCol=Khaki shWidth=8 clip=15 shCol=Black thumbnails
filter2 class=XBorderFilter bgCol=#8fa1b9 boWidth=20 boCol=ivory frWidth=10 frCol=Khaki shWidth=15 clip=25 shCol=Black closeups

The background color bgCol is again selected with the color picker in PhotoShop Elements, to match the color of the used background photo. 

However with the newest versions of the skins it is also possible to create shadows with the skin settings, see this album. Create shadows by checking check-mark 'Show shadows on the index page' on the Index page / General tab and 'Show shadows on slide page' on the Slide page tab.

You can download the Slide Show 4 skin here and the PhotoSwipe skin here. Read the user manual for both skins here. The jAlbum program can be fetched here.

14 juni 2014

GPS kaarten maken met Mobile Atlas Creator

Met het stand-alone programma Mobile Atlas Creator kunt U zelf kaarten maken voor een Garmin GPS die CustomMaps ondersteund, wat o.a. voor de GPSmap 62 het geval is. Het programma heeft meer mogelijkheden, bijvoorbeeld voor de iPad Galileo app, maar we bespreken hier alleen het maken van Garmin CustomMaps.

Download het programma van http://mobac.sourceforge.net/. U download een zip-file en na het unzippen van deze file in bijvoorbeeld map “C:\Mobile Atlas Creator 1.9.16” bent U klaar met de installatie. Ik bespreek hier de laatste versie 1.9.16. Voor dit programma moet het Java Runtime Environment Version 6 Update 14 (v1.6.0_14) of hoger wel op Uw systeem geïnstalleerd zijn (wat meestal zo is), U kunt versie 7 installeren vanaf http://java.com/nl/download/index.jsp. Ik heb het programma gebruikt op een PC met Windows 8.1, maar U kunt het ook op een MAC en LINUX systeem gebruiken.


Start het programma op door file “Mobile Atlas Creator.exe” in map “C:\Mobile Atlas Creator 1.9.16”  te openen. U kunt het beste een snelkoppeling naar die file op Uw bureaublad maken.


Klik eerst op Settings en daarna op tab Map Size en vul als Maximum size in 1024.


Selecteer daarna de Map Source, bijvoorbeeld 'OpenStreetMap MapQuest' en breng het gebied waarvan U een kaart wil maken in beeld. Met de rechter muisknop ingedrukt kunt U de kaart verplaatsen en U kun in- en uitzoomen met het muiswieltje of door bovenin links het zoom-niveau te vergroten of the verkleinen.

Selecteer het gebied waarvan U de kaart wil maken door de linker muisknop ingedrukt te houden en met de muis over het te selecteren gebied te schuiven en daarna de muisknop weer los te laten.

Kies in de groep Zoom Levels de waarden 14 en 16. Hoe hoger het getal, hoe verder er U kan inzoomen op Uw GPS, maar bij de meeste kaart bronnen geeft 17 of hoger een foutmelding.


Klik nu in de groep Atlas Content op de knop New, geef de kaart een naam, kies als kaart format Garmen Custom Map (KMZ) en klik op OK.


Klik daarna op Add selection en tot slot op Create Atlas. Nu wordt er een voortgang venster getoond. Als het downloaden van de map klaar is, klikt U op de knop Open Atlas Folder. U ziet dan in de Verkenner een map met de naam van de kaart, gevolgd door de creatie datum. Open die map en geef de file die daar in staat, Layer.kmz de kaart naam die U in Uw GPS wil zien, byvoorbeeld MijnKaart.KMZ. Wijzig de file extensie niet!. Als Google Earth op Uw PC staat, dan kunt U even dubbelklikken op de KMZ-file om te controleren hoe de kaart eruit ziet.


Het kan ook zo zijn dat U na het klikken op de knop Create Atlas de foutmelding 'Layer exceeds the maximum map count of 100 Error caused by layer “Layer”'. Maak in dat geval het gebied kleiner of verlaag de geselecteerde Zoom levels en druk opnieuw op de New knop of delete de Layer.


Verbind nu Uw GPS met de PC, open map Garmin en daarna de sub-map CustomMaps. U kunt custom maps op Uw GPS niet afzonderlijk aan en uit zetten, dus maak de sub-map CustomMaps eerst leeg en kopieer daarna de MijnKaart.KMZ file die U gemaakt heeft vanuit  PC map “C:\Mobile Atlas Creator 1.9.16\atlases” naar GPS map “I:\Garmin\CustomMaps” (de Drive letter I kan bij U anders zijn, afhankelijk van het aantal disks op Uw PC). Als U meerdere custom maps in de GPS zet, dan wordt het systeem ook veel trager.


Verwijder daarna de GPS van de computer en start de GPS. Ga naar menu Stel kaart in en vervolgens naar Selecteer kaart. In de lijst die U dan ziet moet o.a. De gemaakte Custom map staan: Aangezet – Aangepaste kaarten  MijnKaart.KMZ.


Om de kaart goed te beoordelen kunt U het beste alle andere kaarten uitzetten en alleen de nieuwe kaart aanzetten. We bespraken hier Map Source 'OpenStreetMap MapQuest', maar U kunt ook een ander type kiezen bijvoorbeeld 'OpenStreetMap Hikebikemap.de', 'OpenStreetMap Public Transport' of 'OpenStreetMap 4UMaps.eu'. De meeste andere types zijn voor Nederland niet bruikbaar, U kunt ze in de settings verwijderen. U moet zelf beoordelen welk kaart type het beste is af te lezen in Uw GPS. Mijn GPS reageerde vrij traag op deze kaarten, dus in het begin is het beeld wat wazig, maar naar een tijdje ziet U scherpe lijnen en teksten. 


Voor mijn wandelingen geeft ik de voorkeur aan Map Source  'OpenStreetMap 4UMaps.eu' maar voor fietstochten is 'OpenStreetMap Hikebikemap.de' denk ik beter.

Als U Uw keuze bepaalt heeft, dan kunt U deze kaart combineren met andere kaarten die al op Uw GPS staan, door die kaarten ook aan te zetten.

Met de oude versie MOBAC 1.8 kun je ook nog kaart types Google Maps, Google Terrain, Microsoft Maps, Microsoft Virtual Earth en Ovi/Nokia Maps ophalen, De satelliet kaarten zijn moeilijk leesbaar in de GPS. Zoek in Google naar “mobac 1.8 download zip”, dan kunt U die oude versie nog wel ergens ophalen.

20 oktober 2012

Compressing a Slide Show 3 album with program EditPhotoInfo

In the last version of program EditPhoto info, this function has been removed: you beter rebuild your album with the Slide Show 4 skin!

A slide show presentation made with the jAlbum program with an 'Improved slide show 3' contains for each picture a web page ('slide page'). You can replace these slide pages by one new page 'slidePageSS3.html' with my program EditPhotoInfo by clicking the 'Compress Slide Show 3 Album' button and next selecting the index file of the album:
This makes the space required for the album smaller, but more important, it removes the flashes you see sometimes in the slide show on a Windows PC with the Internet Explorer and the Google Chrome browser. You can't apply this with an album containing one or more movies.
After this action you can remove the old jAlbum slide pages by clicking button 'Remove SS3 slide pages'. Before you do that, you should possible execute one or more actions given below.
For making a compressed Slide Show 3 album, you should execute next actions in the following order:
  1. If there is a GPS track available for the pictures in your album, you can add the GPS locations to your pictures. Click 'Open...' and select one of the album jpg files. Next click the 'Tracklog...' button and select the gpx file of the track.
  2. Compose your panorama pictures with a stitching program.
  3. Open the viewer and remove the failed photos. Add descriptions for the pictures.
  4. Next you can change the picture names and other data by clicking the 'Change data ' button.
  5. Start the jAlbum program, select the 'Slide Show 3' skin on the left site of the window and adjust the skin parameters. Next generate the album. The jAlbum program will create the directory with the index file and a 'slides' sub-directory with for each picture an html file.
  6. If you like to add a waypoint file map.kml which shows all camera locations in Google Maps, you can fetch the Google Maps URL for that file by clicking the 'Link' button. Paste this address into the URL field 'Links' tab of the Slide Show 3 adjustments 'Links' tab. Generate the album again with this setting. It is important that fields 'Local map' and 'External URL' in the Options window contain the correct data.
  7. Check checkmark 'Google Earth links' and click 'Make files' if your pictures contain GPS data and you like to show for each slide the camera location in Google Earth. Checkmark 'Google Earth Waypoints' should be unchecked and in the Slide Show 3 adjustments 'General' tab you should uncheck 'Show locations in Google Maps'. If you also like to show the camera locations, check checkmark 'Google Maps links'. However if your album should only show the camera positions in Google Maps, you can skip this point and check checkmark 'Show locations in Google Maps' on the 'General' tab of the Slide Show 3 adjustments window.
  8. The next step are the optional special panorama web pages which can be made by the EditPhotoInfo program. These web pages are opened by the slidePageSS3.html page, but only if radio button 'Replace file' is selected and checkmark 'Show first a survey of the panorama' is checked before the panorama page is generated.
  9. After these steps, click the 'Compress Slide Show 3 Album' button and select the index page of the album. This action will put two new files in the slides directory: 'slidePageSS3.html' and 'slidePageSS3.js'. The right part of the window shows a log of changed files.
  10. If your pictures contain GPS data and you like to show all camera positions in one waypoints file, check checkmarks 'Google Earth Waypoints' and 'Use the web site photos' and click button 'Make files'. File map.kml is written to the index file directory. Checkmarks 'Google Earth links' and 'Google Maps links' should be unchecked. It is important that fields 'Local map' and 'External URL' in the Options window contain the correct data. Optionally add the tracklog to file map.kml with the Google Earth program and save it again in the index file directory.
  11. Remove now the jAlbum slide pages by clicking the 'Remove SS3 slide pages' button.
  12. Use an FTP program to put the slide files on your web-server.
For more information see the on-line helpfile of program EditPhotoInfo.
You can download program EditPhotoInfo from my download page.
Click here for more information over the Improved Slide Show 3 skin.

06 december 2009

Google-Earth coördinaten over brengen naar een Garmin Gps

Via een e-mail werd mij gevraagd hoe Google-Earth coördinaten overgebracht kunnen worden naar een Gps. Omdat het antwoord mogelijk voor meer mensen interessant is, geef ik hier het antwoord.

Zorg er eerst voor dat in Google Earth en in het Garmin GPS MapSource programma hetzelfde formaat voor de coördinaten gebruikt wordt.
Ga daarvoor in het Google Earth menu naar Extra / Opties... en selecteer dan het '3D-weergave' tab-blad. Selecteer daar in het vak Breedte/lengte weergeven 'Decimale graden'. Doe dat in MapSource via menu Bewerken/voorkeuren... en zorg ervoor dat in het tab-blad 'Positie' achter Grid staat 'Lengte/Breedte hddd.ddddd°' en achter kaartniveau 'WGS 84'.

Met de hand kunt U een positie als volgt overbrengen:

Voeg in Google Earth via menu Toevoegen/Plaatsmarkering een nieuw Waypoint toe. Verschuif het gele prikkertje naar de positie die U wil overbrengen. In Het 'Nieuw Plaatsmarkering' venster ziet U dan de positie, b.v. Breedtegraad 52.370307° en Lengtegraad 6.673646°

Start nu MapSource en selecteer Bewerken/Nieuw waypoint. Neem nu via het klembord (Ctrl+C) de Breedtegraad over uit het Google Earth waypoint venster. Selecteer in het MapSource venster 'Positie' alle cijfers achter de N en zet daar de breedte graad uit het klembord neer (Ctrl+V). Haal het ° teken weg. Doe dan hetzelfde met de Lengtegraad, vervang daarmee de cijfers achter de letter E. U zie dan in ons het voorbeeld in het MapSource Positie venster staan: N52.370307 E6.673646. Geef het waypoint een naam en klik op OK. U ziet dan het nieuwe punt op de MapSource kaart. Via Overdragen/Verzenden naar apparaat.. kunt U het punt dan in de GPS zetten.

Het kan ook automatisch als U mijn programma ConvertTrack op Uw PC geïnstalleerd heeft. U kunt dat programma ophalen vanaf mijn website.

Klik in Google Earth links in het venster 'Plaatsen' op de map 'Tijdelijke plaatsen'. Maak vervolgens in Google Earth de waypunten aan die U wil overbrengen. U kunt dat snel doen door op het gele prikkertje van de bovenste werkbalk te klikken. Zet het prikkertje op de gewenste positie en geef het een naam, b.v. de eerste '01', de tweede '02' etc..

Als U alle punten uitgezet heeft dan klikt U met de rechtermuisknop op de map 'Tijdelijke plaatsen' en selecteert U 'Plaats opslaan als ..'.
In het volgende venster selecteert U achter de tekst 'Opslaan als: 'Kml(*.kml). Geef de gewenste bestandsnaam op en klik op 'Opslaan'.

Start daarna programma ConvertTrack en klik op de Open knop. Selecteer rechts onderin het type file Waypoints files (*.kml), selecteer de file die U met Google Earth gemaakt heeft en klik op OK. Klik daarna in het ConvertTrack hoofdvenster op de knop 'Sla op als...". In het volgende venster selecteert U achter Opslaan als: 'Route file (*.gpx)' , geeft U de gewenste Bestandsnaam op en klikt U op 'Opslaan'. Klik daarna in het hoofdvenster van ConvertTrack op de onderste 'Toon Track' knop. MapSource wordt gestart en U ziet de route in MapSource.

Via Overdragen/Verzenden naar apparaat.. kunt U de route dan in de GPS zetten.

Het is ook mogelijk om Uw route in Google Earth als track te tekenen. Klik daarvoor de rechter muisknop op 'Tijdelijke plaatsen'. Selecteer in het pop-up menu 'Toevoegen' / 'Pad'. Type de naam van de tocht in het nieuwe venster dat U dan ziet. Klik dan met de linker muis in de kaart, waar de route begint en daarna in het volgend punt waar de richting van de route verandert. Doe dit voor alle andere punten tot het eindpunt. U kunt ook de linker muisknop ingedrukt houden en die dan over de gehele route schuiven om een track te maken. Klik als U klaar bent op de OK knop van het venster. Sla dan de track op in een kml file en gebruik mijn ConvertTrack programma om die file om te zetten in een gpx tracklogfile zoals boven omschreven is.

04 november 2009

Mogelijke neurologische bijwerkingen van het vaccin tegen de Mexicaanse Griep

Via de radio hoorde ik onlangs van een uitgelekte brief over de bezorgdheid van neurologen over 25 doden in Amerika. De brief komt van de Health Protection Agency, het officiële orgaan dat toeziet op de volksgezondheid en is uitgelekt naar het engelse dagblad The Mail.

In het e-boek “De verborgen gevaren van vaccinaties” gaat mevrouw T.C. Kuiper – van den Bos uitgebreid in over de vergrote kans op neurologische bijwerkingen zoals GBS (Guillain-Barré syndroom) en MS. De squaleen moleculen in het Mexicaanse griep vaccin kunnen zich volgens haar verhaal in de isolatie laag rond de zenuwen nestelen. Die squaleen moleculen zouden ruimtelijk gedeformeerd worden door andere electro-actieve stoffen zoals aluminium en kwik die ook in het vaccin zitten en daardoor aangevallen worden door ons immuniteitssysteem.

Ik kan als leek niet echt beoordelen of dit juist is, maar mevrouw Kuiper heeft dit in open brieven gemeld aan de Nederlandse Vereniging van Neurologen, aan het Nederlands Huisartsen Genootschap en aan de Gezondheidsraad (Via een brief aan de ministers Balkenende en Klink).

Alleen Nederlandse Vereniging van Neurologen heeft mevrouw Kuipers een reactie gegeven:

“Het bestuur van de Nederlandse Vereniging voor Neurologie deelt uw zorg met betrekking tot de eventuele neurologische bijwerkingen. Er komt derhalve een landelijk onderzoek naar het mogelijke verband tussen het Guillain-Barré syndroom (GBS) en vaccinatie tegen Mexicaanse griep, dat het Erasmus MC en het RIVM in samenwerking met de Nederlandse Vereniging voor Neurologie, LAREB en CBG zullen gaan uitvoeren.”

Mevrouw Kuiper vertelde mij ook dat er op de bijsluiter van Novartis wel een melding gegeven wordt dat men moet oppassen als men een geschiedenis heeft van GBS. Klik hier voor meer informatie over het Focetria Vaccin tegen de Mexicaanse Griep:

Er is wel een duurder vaccin zonder squaleen, aluminium en kwik: Celavapan. Klik hier voor meer informatie over dit vaccin van de firma Baxter.

In de Volkskrant stond dat dit vaccin o.a. door het Duitse leger gebruikt.

Waarom wordt dit in Nederland niet toegepast voor patiënten met een neurologisch risico?

Zie ook deze en deze discussie in het NRC weblog.

28 februari 2006

Toon de locaties waar foto's genomen zijn in Google Earth!

Als je wat met landkaarten hebt, zoals dat bij mij het geval is, dan moet je zeker Google Earth op je PC installeren. Ik vind het fascinerend om via de aan elkaar geplakte satelliet foto's in te zoomen op locaties die je kent of waar je juist naar toe wil.

Klik op de volgende knop om Google Earth the installeren:


Een mooie toepassing van dit programma is de mogelijkheid om locaties in
kmz files op te slaan, zodat je via die file weer snel dezelfde locatie kan laten zien.
Selecteer eerst in het venster 'Places' een map waarin de kmz file moet worden bewaard, maak daar desgewenst via de rechtermuis knop een nieuwe map. Als je in Google Earth ingezoomd ben op een stuk van de aarde waar je een locatie wil vastleggen, dan maak je een kmz file via het menu onderdeel 'Add / Placemark'. Er verschijnt een nieuw venster waarin de naam en andere details van de locatie vastgelegd kan worden en in de kaart zie je een een symbool, meestal een soort punaise, waarmee de exacte positie vastgelegd kan worden. Wijzig het type symbool desgewenst in de rechterbovenkant van het venster en sleep het symbool naar de juiste positie in de kaart. Type de naam van de kmz file in het placemark venster en geef desgewenst een beschrijving mee die getoond zal worden als je later op het placemark symbool klikt. Door 'Advanced' aan te vinken, kun je nog meer vastleggen, o.a. de hoogte van de locatie. Doe dat echter niet want dan lijkt het placemark symbool later weg te lopen van de plek die je aangegeven hebt.


Als je nu een webpagina gemaakt hebt waarin b.v. een foto staat en je wil laten zien waar die foto genomen is, dan zoek je in Google Earth de plaats op en maakt er een kmz file van. Die file moet naar webpagina server geupload worden, daarom moet je die file uit Google Earth exporteren door met de rechtermuis op de placemark naam te klikken en dan het commando 'Save As ...' te selecteren. Bewaar de file bijvoorbeeld in een map Placemarks in de mappen structuur van je
website. Maak met je html editor een hyperlink onder de foto en geef in die hyperlink als adres de opgeslagen kmz file aan. Sla alle wijzigingen op en bekijk je website met een browser. Als je daarmee op de hyperlink onder de foto klikt, dan zal je zien dat Google Earth opstart en inzoomt op de vastgelegde locatie.


Volg deze procedure voor alle locaties die je wil laten zien en upload de webpagina's en de placemarks map naar de server. Als je dat gedaan hebt en de webpagina nu vanaf Uw server bekijkt, dan zal je net als ik de eerste keer, teleurgesteld zijn, want Google Earth start niet op als je op een placemark hyperlink klikt. Ik heb een oplossing voor het probleem gevraagd in een forum van de Google earth Community en zij hebben mij goed geholpen. Er moet een file in de placemark map op de server gezet worden worden met de volgende inhoud:


AddType application/vnd.google-earth.kml+xml kml

AddType application/vnd.google-earth.kmz kmz


De naam van de file moet zijn ".htaccess" als U een Apache server heeft. Maak deze file in het kladblok programma en omdat er geen file extensie is moet er bij het opslaan als filenaam gegeven worden .htaccess en als type Alle bestanden. Daarna gedraagt de website zich zoals het was op de PC.


Het is ook mogelijk dat je vanuit een placemark in Google Earth de webpagina met de corresponderende foto opent. Dat kan omdat je in de beschrijving van een placemark html code mag gebruiken en zo je dus een link naar de webpagina met de foto kunt maken. Het adres van de link moet een internet adres zijn en niet de locatie van de webpagina op je PC. Daarom ging ik
als volgt te werk. Nadat ik de webpagina's met de placemarks op mijn server gezet had, startte ik mijn html editor, Frontpage, op en begon daar met een nieuwe pagina. Voor elke placemark, waar een link naar de webpagina met de foto moest komen, begon ik de beschrijving te geven in Frontpage. Het adres van de link kopieerde ik uit mijn browser, nadat ik de betreffende foto pagina uit mijn server geladen had. Ik opende in Google Earth het betreffende placemark voor een edit actie en kopieerde de html code naar de beschrijving via het klembord. Daarna werd de oude placemark file in de Placements map op mijn PC overschreven via een Save As commando.


Nadat ik alle Placemarks op deze wijze bewerkt had, klikte ik met mijn rechtermuis in Google Earth op de map waarin alle placemarks stonden en deed daarna ook een Save As actie naar mijn locale Placemarks map met als naam van de kmz file de naam van de map. Op mijn website maakte ik een link naar die kmz file, waardoor alle placemarks in een keer zichtbaar gemaakt kunnen worden in Google Earth en je zo dus vanuit Google Earth de webpagina's met de foto's kunt selecteren Tot slot werden de placemarks en de gewijzigde webpagina's weer geupload naar de server.


Het geheel kunt U zien door in mijn website op de link Wandelen op La Palma en vliegen via Google Earth te klikken.

19 oktober 2004


Dit moet een nieuwe kamer met balcon worden ... Posted by Hello

De verbouwing is begonnen, stevige jongens uit Haaksbergen brengen het staal naar boven. Posted by Hello

10 oktober 2004


Vandaag maakten we in het mooi herfstweer een wandeling in de Engbertsdijksvenen Posted by Hello